How to Turn a Blog Post into a Video with AI (Step by Step)
Learn blog to video with AI. Turn a post into a video from a link or a document, with the real costs, limits, and fixes covered.
12 Nov 2026·16 min read·Insights
Hours of work go into a blog post, yet it reaches only the readers who find it, click, and stay long enough to read it. Plenty of people who would value the same ideas never get that far, because they would rather watch than read. A short video closes that gap, and blog to video tools now let AI build a first draft from your post without a video editor.
The process is simpler than it sounds. AI builds the video while you direct it, and your job is to keep control of the script and the scenes. The steps below follow a worked example with a free-to-download tool, and they apply to any AI video tool that gives you that control. The guide also lays out what the workflow really costs and where it falls short, so you can judge whether it suits you before you invest the time.
Quick answer: To turn a blog post into a video with AI, cut the post to a 150 to 200 word script, give an AI video tool the script or the post's link, swap generic visuals for your own screenshots, add narration and captions, and export a 60 to 80 second video that points back to the post.
Why Turn Blog Posts into Videos?
A video is worth the effort when it reaches people the post cannot. Survey data hints at how large that group may be, as long as you read it with its limits in mind.
In Wyzowl's 2026 State of Video Marketing survey, 63% of consumers said they would most like to learn about a product or service from a short video, against 12% who chose an article. Marketers in the same survey rated 30 seconds to 2 minutes as the most effective length, with 51% pointing to 30 to 60 seconds, which fits the script length used below.
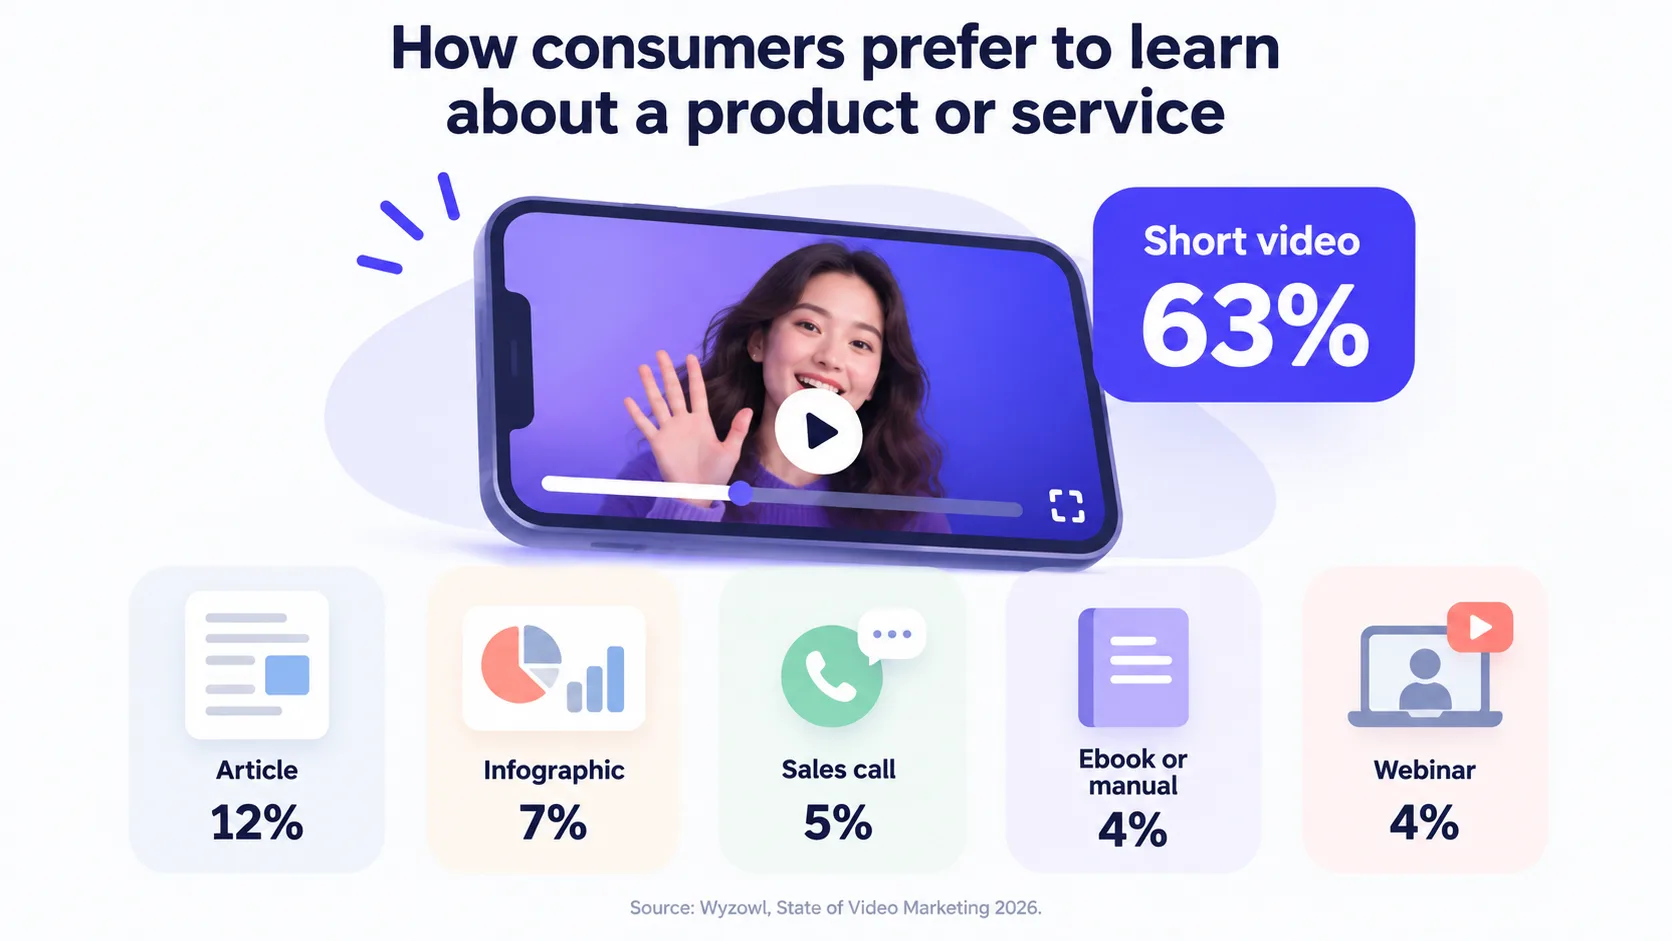
Treat the numbers as direction. The survey covered 266 people, relied on self-reported answers, asked about learning about products rather than reading blog posts, and comes from a video production company.
Three practical reasons remain.
Different readers: Some of your audience will never read 1,800 words but will happily watch a minute of video on a phone.
A second place to be found: In the survey, 82% of video marketers used YouTube and 69% rated it effective, which gives your idea a home your own site cannot offer.
A route back to the post: A short video works as a trailer, and placed at the top of the page it doubles as a quick summary.
The work is also smaller than a fresh video project, because the argument and the evidence already exist in the post. The risk is a careless video, since viewers notice a template quickly. The value comes from controlling the message and the visuals, which the rest of this guide shows how to do.
What You Need and What It Costs
The studio is free, but a full workflow has a few parts, and some of them may carry their own costs.
A video studio: The worked example uses CoAnimator, an agentic animation studio, meaning a desktop app where an AI agent builds and edits videos as project files. The app runs on macOS (Apple Silicon), Windows (64-bit), and Linux, needs no account, and renders on your own machine with no credits. Free exports are 720p and carry a "Made with CoAnimator" watermark.
An AI agent: An assistant that can read files and change a project for you, such as Claude Code, Codex, Antigravity, or OpenClaw. CoAnimator's site also mentions an agent that ships with the studio. Otherwise you bring your own subscription, and that cost sits outside CoAnimator.
A voice provider: Voiceover is part of the free plan, but CoAnimator's pages say its plugins work on your own keys, so check whether the voice service you connect bills separately.
Your post: The post's public link, or a document copy such as a Markdown or plain text file that your agent can read.
Visuals from the post: Screenshots, charts, and short screen recordings of what the article describes. CoAnimator's free plan includes screen capture.
In short, the studio costs nothing, while the agent and the voice service are where money can appear. With those settled, the next section shows how the pieces work together.
Choosing the agent that will drive the studio? The Cursor vs Claude Code comparison weighs an AI-native editor against a coding agent that lives in the terminal.
How AI Converts Blog Posts into Videos
Whatever tool you pick, the workflow follows one loop. You decide the message, the AI builds the scenes, and you review and steer.
In CoAnimator, that loop runs through an agent that holds the whole project. The agent reads the project, changes it, renders it, and checks the result. Ask for one fix and it edits the scene you named and leaves the rest alone, because the project is stored as ordinary files rather than as one rendered clip.
Two terms recur below. A scene is one visual beat of a few seconds, such as a title, a screenshot, or a chart. A project is every scene, the narration, and the settings, stored as files on your computer.
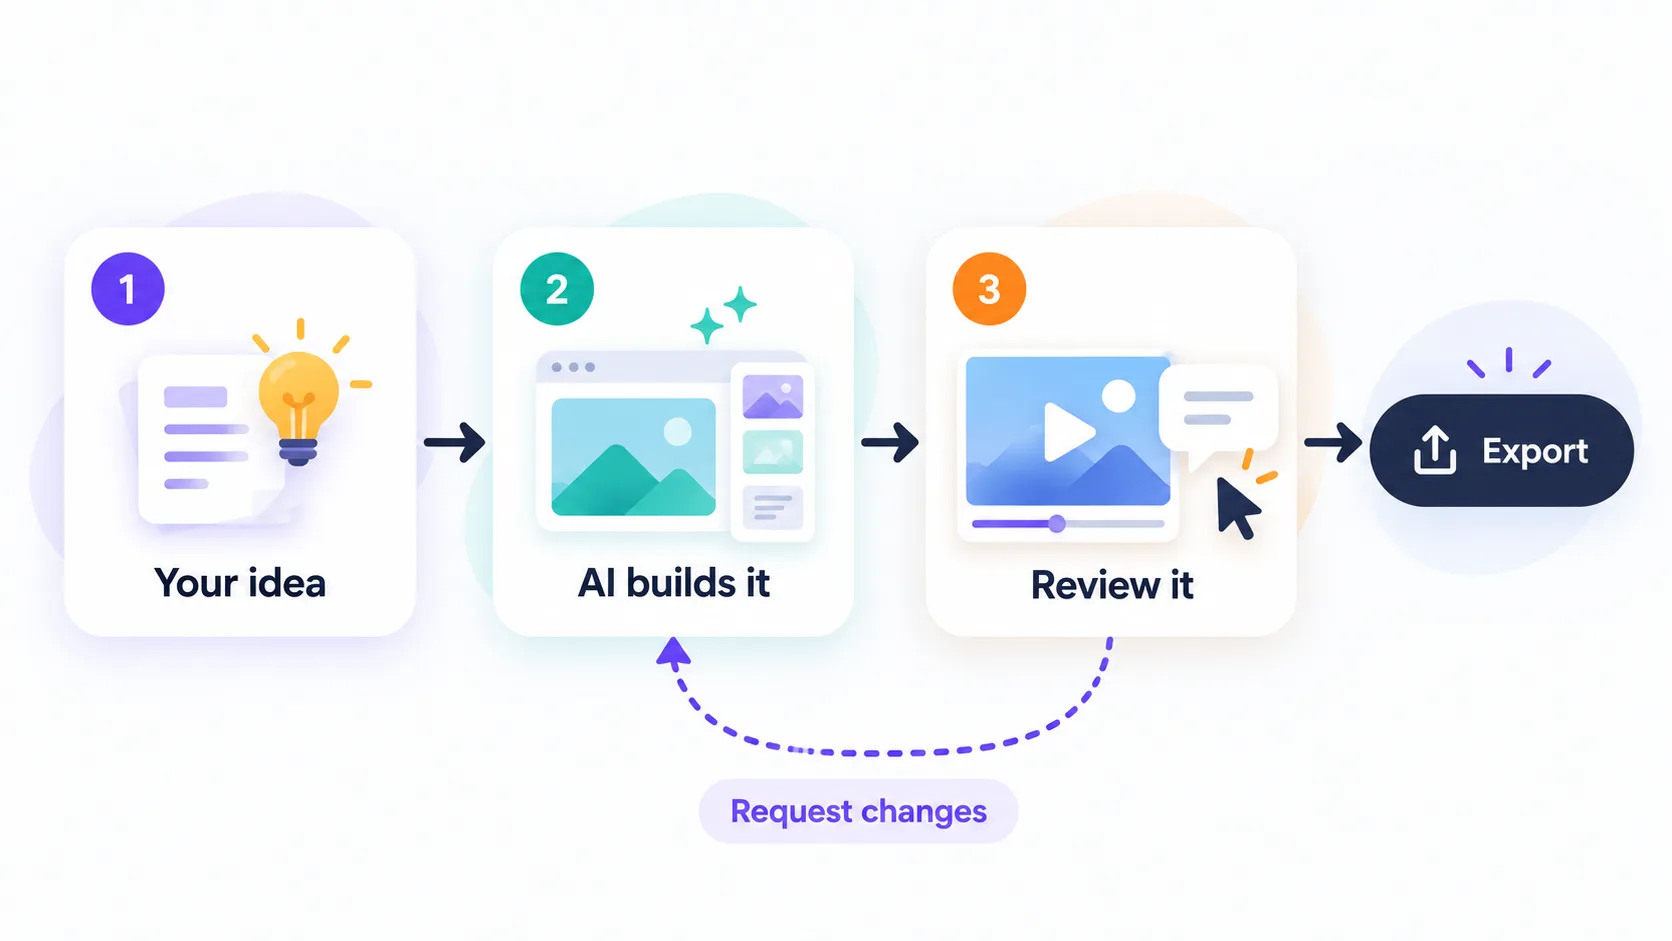
The loop behind every step in this guide.
Keep that loop in mind while you work through the steps.
Convert a Blog Post into a Video in 7 Steps
Seven steps take you from a finished post to a published video. The first and last matter most, because the script sets the message and the publishing choices protect your page and your channel.
Step 1. Choose the post and write the script
A strong script is short, spoken, and built around one promise. Start with a post where the argument can be seen or counted, such as a how-to, a comparison with a clear verdict, or a list of three to seven items. Long opinion essays and code-heavy posts lose too much when cut to a minute. The same steps work for an article or a newsletter issue, since the tool only needs the text.
Reduce the post to 150 to 200 words. Narration runs at roughly 150 words per minute, which gives you 60 to 80 seconds. Build the script from four parts.
A hook, which is one opening line that states the reader's problem.
Three main points, one idea each.
A one-line takeaway.
A call to action, which tells viewers what to do next. Here it points back to the post.
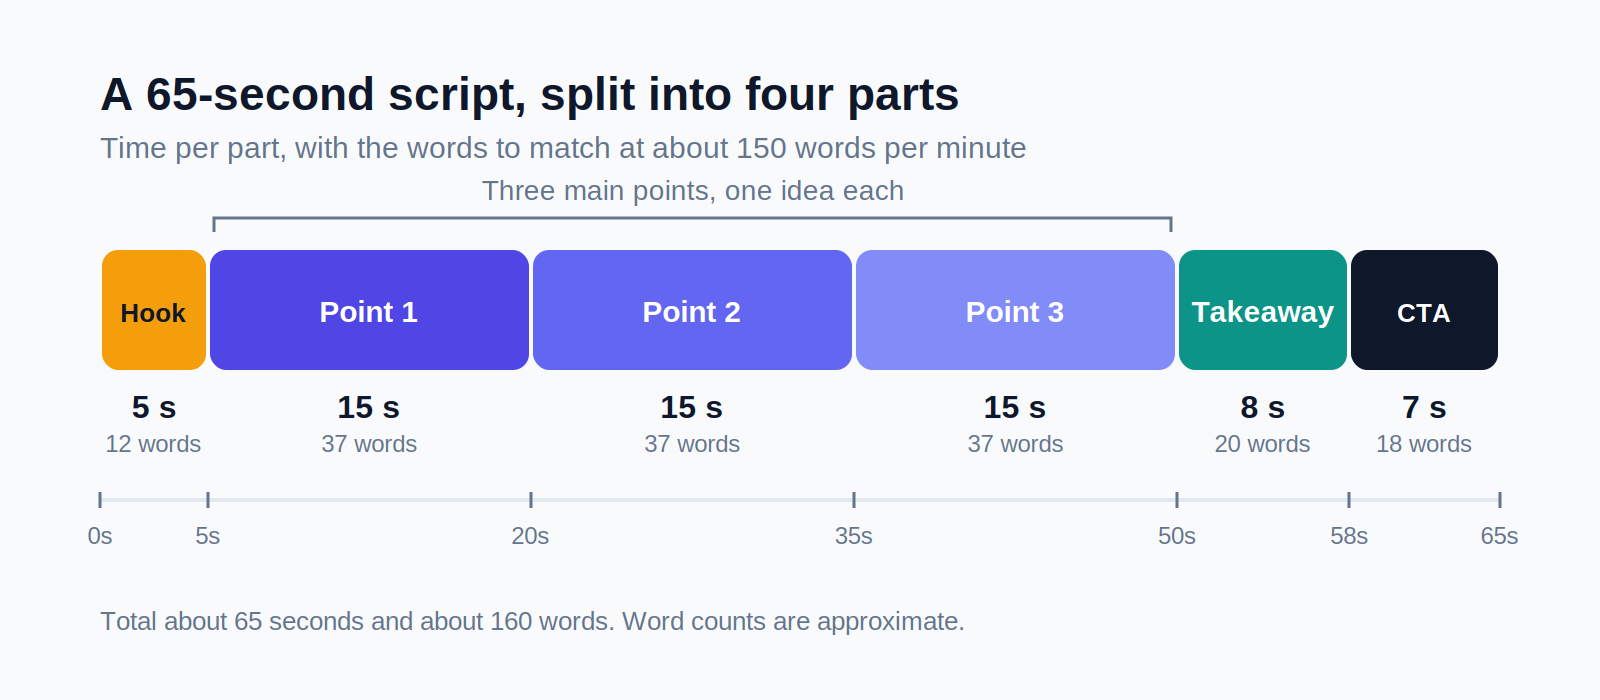
A 65-second script split into its four parts.
Two routes lead to the script. Let the agent draft it from your link or document and then edit it, or write it yourself, perhaps with an AI writing tool to condense the article. A draft from the agent is faster, while writing it gives you the most control. Either way, read the script aloud and shorten any sentence you stumble over.
Take a post like n8n vs Zapier, which frames the choice as execution-based billing and self-hosting against the widest connector catalogue. The video could open with a line about how an automation tool bills you and where it runs. One point each on usage, hosting, and integrations would follow, and a closing line would send viewers to the full comparison.
If you wrote the script, save it as script.md beside the post.
Step 2. Set up the studio, the agent, and a template
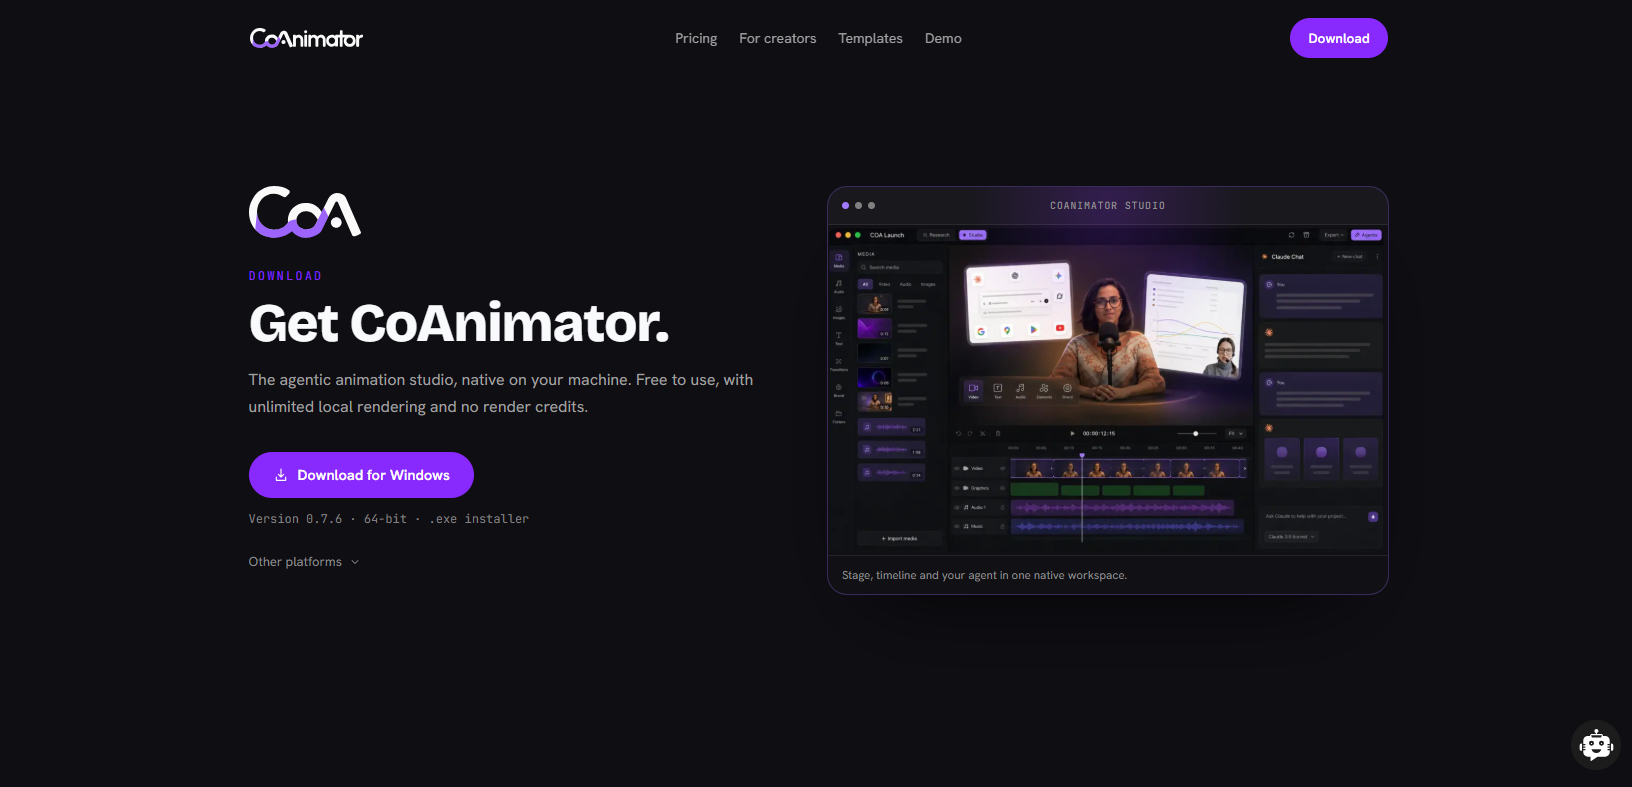
Download the installer from CoAnimator's site, open the app, and connect your agent. CoAnimator describes connecting an agent as a setting rather than a migration, so look for the agent option in the settings.
Next, create a project from a template, which is a ready-made starting point with a look and building blocks already in place. The Motion Graphics template suits blog posts because it is built for films that are mostly words. Useful blocks include headlines whose last words switch to an accent colour, numbered lists that arrive one item at a time, full-colour beats with a single line of text, and a closing card with a logo and URL.
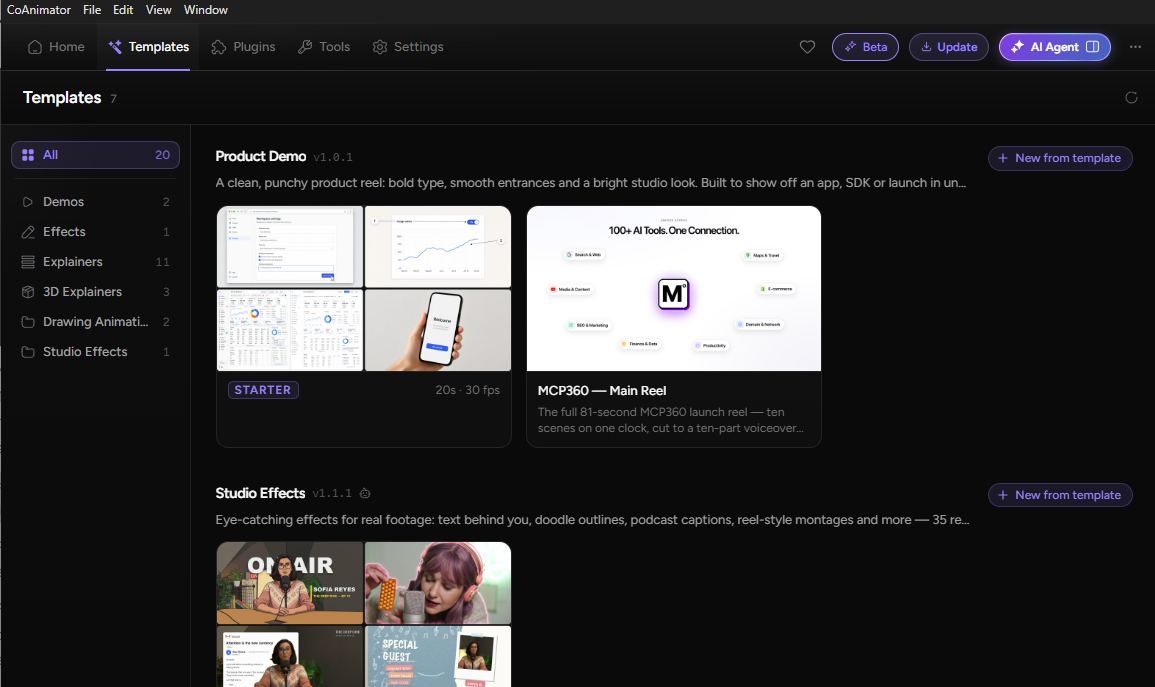
Play a bundled sample project through first. The timeline, the strip at the bottom of the app where scenes and audio line up against time, makes more sense once you have watched a finished one.
For scripted or scheduled renders later, the app also ships a command line tool called coa, which you run by typing a command instead of clicking. According to the developer documentation, one menu click makes it available on your computer, and a second installs a skill, which is a set of instructions that teaches your agent the tool's options and project layout.
Step 3. Brief the AI with the post
A brief is the instruction you give the agent. Add your post, either as blog.md or as a link, along with script.md if you wrote one, your screenshots, and any recordings. CoAnimator can start from a document or a link, and the more material you supply, the less generic the first draft becomes.
For a look at the document route in practice, here is a user building a video from a document.
https://x.com/superman_space/status/2112543420392902790
An example post on X showing a video being built from a document.
Here is an example brief to adapt.
Use the Motion Graphics template. Read blog.md, plus script.md if it exists, and make a 65-second video that sends viewers to the full post. Open with the reader's problem in a single line, give the three main points one at a time as numbered beats, and end on a closing card showing the post's URL. Use my brand colours, keep every scene between 3 and 5 seconds, and use my screenshots wherever the post shows a real screen. Show me the narration script before you animate anything.
Three details in the brief do the heavy lifting.
Script first: The message can be corrected while changing it is still cheap.
Your screenshots: The agent avoids filling scenes with generic imagery.
A scene length: The video stops feeling like a slideshow.
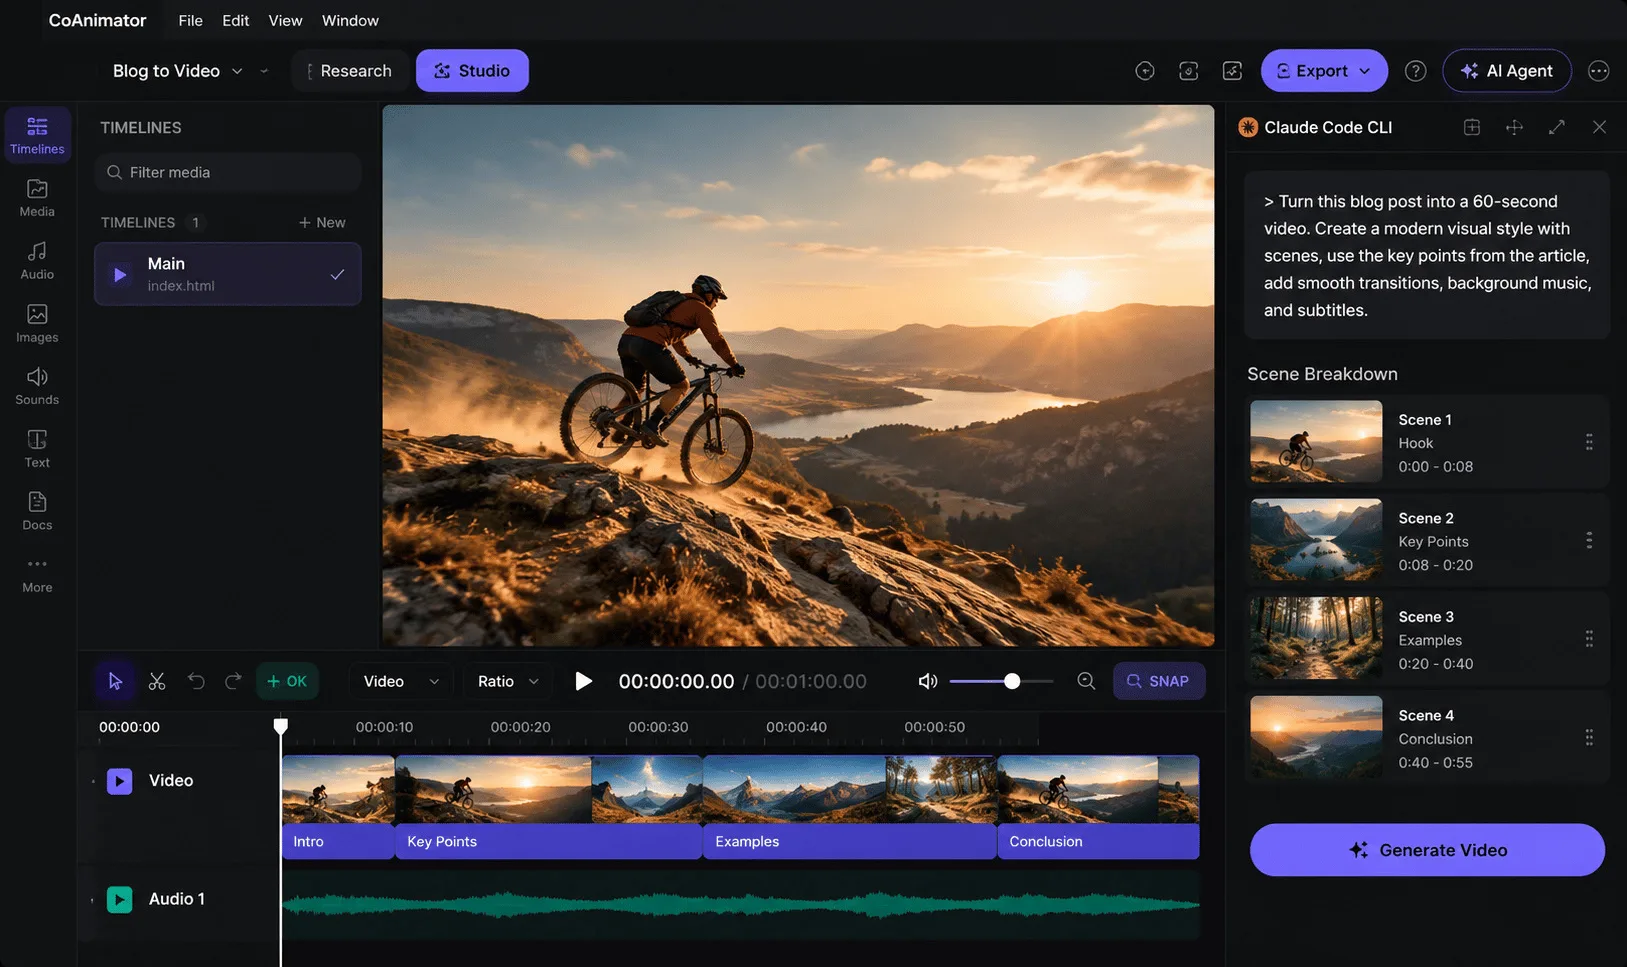
Step 4. Review and fix scene by scene
The stage is the live preview window in the app, and it updates as the agent works. Go scene by scene and ask the same question each time. Could this clip appear in a video about any other topic? If it could, ask for a replacement from your own material.
Give direction in plain language, as you would to a human editor.
Ask it to remove a line that repeats the post without adding anything.
Ask it to hold a key number on screen for longer.
Ask it to swap in a specific screenshot from your media library.
Ask it to make the URL the only thing on the closing card.
Keep on-screen text to a short phrase per scene and match it to what the narrator says at that moment. When text and audio disagree, viewers read first and stop listening.
Step 5. Add narration and captions
Narration comes from a text-to-speech plugin, which creates a synthetic voice that reads your script aloud. The audio lands on the timeline like any other clip, and the agent can time each animation beat to it. Change a line in the script and only that line needs regenerating.
Captions are built from the script rather than transcribed from the audio, so they match your wording exactly. Many people watch with the sound off, which makes captions worth including. For a subtitle file (an SRT) to upload to a platform, CoAnimator also offers a free browser-based caption generator.
Play the whole video once at normal speed. AI voices tend to stumble on product names, acronyms, and numbers, so fix each one by changing how it is written in the script.
Step 6. Export the video
Exporting, also called rendering, produces the finished video file. The export dialog lets you choose the quality and the range, which can be the whole timeline, an in and out point you mark, or a custom span. A 65-second version and a 30-second cut can therefore come from one project.
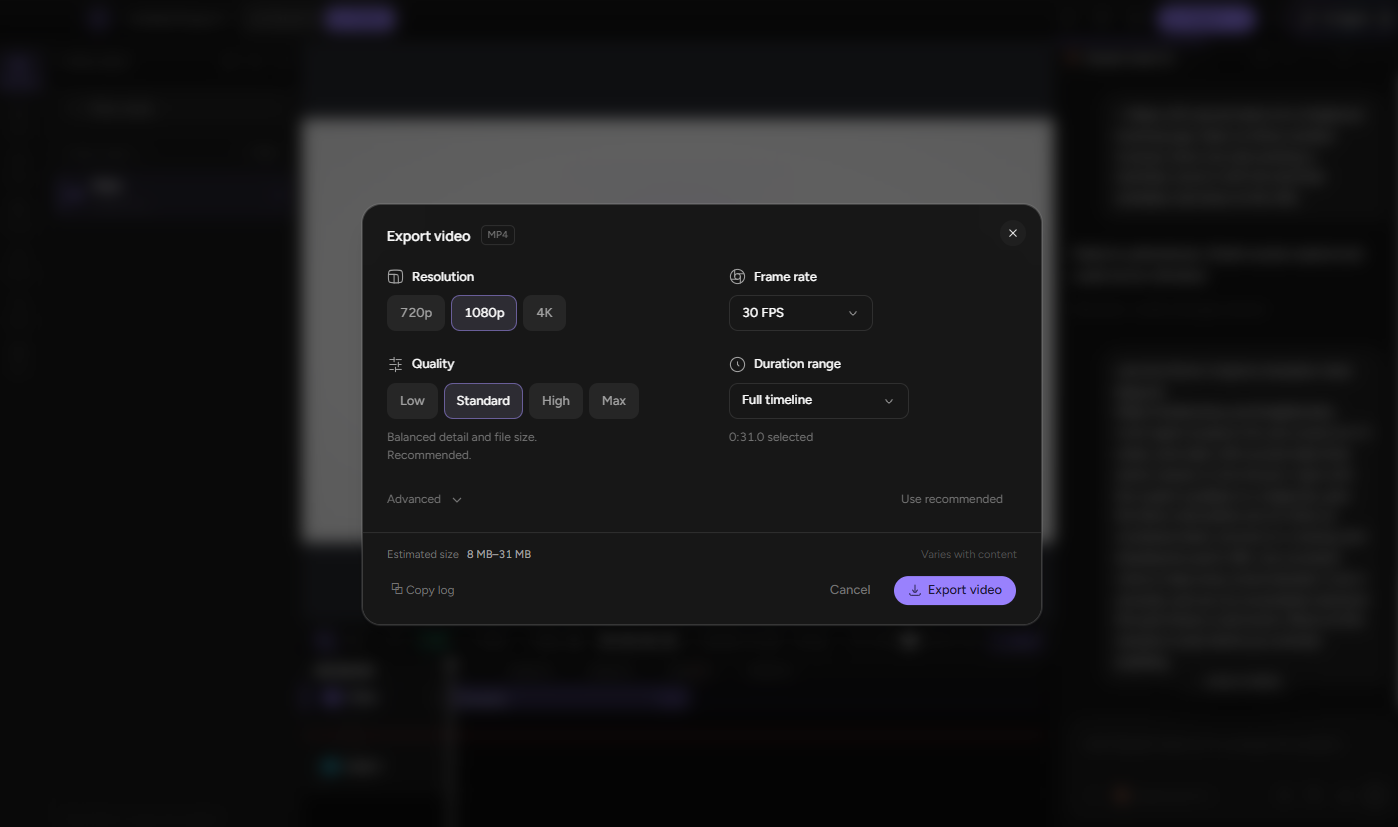
For Shorts, Reels, and TikTok, ask the agent for a vertical version, which uses a tall 9 by 16 frame, with captions built into the picture. Free exports are capped at 720p and carry the watermark, which suits review copies and learning the workflow.
You can also render from the command line.
coa render blog-video --preset 720p30Here blog-video is your project name and the preset sets the quality. The developer documentation lists presets from 720p30 upward and says the command reports success or failure with an exit code of 0 or 1, which makes scripting easy. The same page notes that the packaged coa installer is macOS-first for now, so Windows users should export from inside the app.
Step 7. Publish, disclose, and embed
Three points deserve attention before you publish.
Keep every video distinct: YouTube's monetization policies target mass-produced or repetitive content, including videos that look made from one template with minimal variation. YouTube has also said that channels using AI tools remain eligible for monetization when the content is original and authentic. Give each video its own script and visuals, and read the current policy wording before you publish.
Disclose where required: YouTube asks creators to disclose realistic content that is altered or synthetic, such as a cloned voice of a real person. Check the setting in YouTube Studio and disclose whenever you are unsure.
Embed without slowing the post: Place the video near the top of the article and use lazy-loading, so it loads only when the reader scrolls to it or presses play. A heavy embed can hurt Core Web Vitals, Google's measures of how fast and stable a page feels.
For the upload itself, reuse the post's main keyword in the video title, put the post's URL in the first line of the description, and upload the vertical cut directly to each short-form platform.
Keep the Video Up to Date
A video built as project files is easy to update after the post changes. Replace the screenshot that moved, adjust the line that is out of date, and render again. CoAnimator's documentation describes the same idea for software tutorials, where only the clip affected by a change is swapped before re-rendering.
Teams that publish often can go further. The developer documentation describes running the coa command on a schedule or inside an automated pipeline that fires when something changes. Because no hosted render service exists, the job runs wherever you have installed the app or the command line tool, such as a build server you control.
Keep a person on the final review, because a pipeline that publishes untouched videos recreates the mass-produced pattern YouTube's policy warns about.
Related reading
Starting a render automatically when a post changes takes a workflow tool, and the Make vs n8n comparison weighs two leading options.
The Automation Stack shows how a small team can combine n8n, Zapier, and Make with the tools around them.
AI Blog-to-Video Tools: Limitations and Alternatives
No tool fits every job, so weigh these limits before you commit. When you use a different tool, check whether it shares them.
It needs an agent: The studio is built around an AI agent, so the workflow starts slower without one.
Extra costs are possible: The agent subscription and any voice service sit outside the free studio.
Free exports are watermarked: Exports are capped at 720p and carry a CoAnimator watermark.
Drafts from a link need checking: An agent summarising a page can drop a qualification or misstate a number, so compare the script with the post before any animation.
Rendering is local and the app is young: No hosted render queue exists, and the app was at version 0.7.5 on its download page when this guide was written.
It is not for cutting existing footage: CoAnimator's documentation says it is built for videos that do not exist yet, not for trimming an hour of recording.
Dedicated URL-to-video tools are another route when you want a hands-off first draft. Pictory's documentation describes an API that takes a blog URL and returns a finished video, and Lumen5 says you can paste a blog URL or upload text and let the AI draft visuals, text overlays, and music.
Run any shortlist through a procurement checklist for AI tools before you pay, and pick the tool that matches how much control you want.
Related reading
Free plans often cap usage or hold back features, and a test of free SEO AI tools shows how those limits look in practice.
The tools that sit around a content programme, such as content engines and lifecycle messaging, are covered in the marketing and growth category.
Common AI Blog-to-Video Problems and Fixes
Most problems trace back to the script, the visuals, or the setup. The table below pairs each with a fix.
Problem | Likely cause | Fix |
|---|---|---|
The draft misses a main point | The source was long or the brief was vague | Edit the script first and regenerate, instead of patching scenes one by one |
Scenes look generic | The tool picked stock visuals by keyword | Ask for your own screenshots and charts in those scenes |
The voice mispronounces a name | Synthetic voices guess at brand names and acronyms | Respell the word in the script and regenerate that line |
The agent ignores the project | The agent connection or the skill is not set up | Recheck the agent setting and the skill install described in the developer documentation |
A command line render fails | A prerequisite is missing, or the installer is not available on your system | A third-party comparison lists FFmpeg and FFprobe as needed, and on Windows you can export from inside the app |
The export has a watermark | Free exports carry the watermark at 720p | Treat the file as a review copy until you have the plan you need |
Questions
Frequently asked questions
Can I turn a blog post into a video with AI for free?
Yes, CoAnimator is free to download, needs no account, and renders on your own machine with no credits. Costs can still appear elsewhere, because you need an AI agent, which may carry a subscription, and a voice service that may bill for usage.
Can I turn a blog URL into a video with AI?
Yes. CoAnimator can start from a link or a document, and dedicated tools such as Pictory and Lumen5 also accept a blog URL. A link gives you a fast first draft, but your own script and screenshots make the video look made for the post.
What is the best blog to video AI tool?
The answer depends on how much control you want. Dedicated tools such as Pictory and Lumen5 aim for a quick first draft from a blog link, while an agent-driven studio such as CoAnimator takes more setup and gives you scene-level control. Test your shortlist on one real post and compare how much editing each draft needs.
Do I need to know how to code?
No. CoAnimator's documentation says you describe the video in plain language and the agent writes the animation, timeline, and timing. The project stays open as editable files if you ever want hands-on control.
How long should a blog to video be?
Aim for 60 to 90 seconds on social platforms, which means a script of roughly 150 to 225 words. A video embedded at the top of a post can run slightly longer, as long as every scene earns its place.
Conclusion
The readers who would rather watch than read are still out there, and one video is enough to find out whether you can reach them. Give it a few weeks, then look at a single number, the clicks from the video to the post. Views flatter a video, while clicks show whether it sends people to your writing.
Let that number pick your next video. When viewers click through, convert the posts that already bring steady traffic. When they watch and never click, rework the hook and the closing card before blaming the tool.
Drafts will keep getting easier for everyone, which makes a clear point of view and real examples on screen the things that set a video apart. Your posts already contain both, so the habit you build with this first video will outlast any tool you use to make it.
WebTechOS accepts no payment for coverage, placement or scores. Where a piece references pricing, it reflects published list rates at the date shown.
Keep reading
All insights →8 Best CrewAI Alternatives for Building Multi-Agent Systems
8 real CrewAI alternatives for multi-agent systems, including LangGraph and YourGPT, with features and pricing verified from each company’s own site.
9 Best AI Podcast Editing Software in 2026
Compare nine AI podcast editing tools for transcripts, audio cleanup, multicam video and social clips. See current pricing, limits and best-fit use cases.
7 Best OpusClip Alternatives in 2026
Compare 7 OpusClip alternatives for 2026 by price, limits and fit. Vizard, Submagic, Klap, Descript, Riverside, SupoClip and CoAnimator.
Progressive Web Apps: Offline First Strategy & Service Workers
Build a PWA that works offline for real: caching strategies, service worker code, IndexedDB sync, iOS limits and a readiness scorecard.